

Geant4 Workshop Visualization Tutorial using the WIRED Event Display
This tutorial has been updated for use at the October 2003
Fermilab Geant4 Tutorial, but is also designed for use by anyone else who wants to learn
WIRED Visualization for Geant4.
This tutorial can be used on its own, but gives the most comprehensive introduction to
Geant4 visualization when used as part of the following full set of documents:
The basic
Geant 4 Tutorial
had users run a basic Geant 4 job contained in
geant4/source/examples/extended/analysis/A01
This job produced various kinds of output including a graphics file in a format
called HepRep
(for High Energy Physics REPresentables).
This visualization tutorial will show you how to use the WIRED Event Display
to view that HepRep file
(or an equivalent file included with this tutorial - see details later).
WIRED is a 100 percent pure Java application that can run anywhere that
Java version 1.4.1 or newer is installed. It is currently being used on
all versions of Windows (from Windows 95 to the latest), Linux, Unix and
Mac OSX.
WIRED, and the HepRep graphics protocol, are general purpose tools
that can read data from many sources (such as the BaBar collaboration's
offline and live data servers and the EGS shower simulation program).
Complete instructions on installation and operation of the WIRED Event Display,
along with many additional references, can be found at the
SLAC WIRED Home Page.
But this present document should have enough instructions to get you going.
WIRED's input is something called a .heprep file.
The .heprep file is a plain text file format that contains a full 3D description of what is to
be drawn (geometry, trajectories, hits, markers - depending on what you chose to add from Geant4)
plus visualization attributes (such as color and linestyle) and an extensible set of additional
physics attributes (such as momentum, particle name and energy).
You don't really need to understand the details of the .heprep file format to use WIRED, but in
case you are interested:
-
The .heprep file is an XML format, which means that it is self-describing in a way that lets
many common tools (most web browser) display it with helpful indenting and color coding.
-
HepRep is a hierarchical format: Geant4 volumes have sub-volumes, etc.
HepRep browsers such as WIRED let you control visibility and other attributes based on this
hierarchy (so that you can, for example, interactively turn on and off whole parts of the detector).
-
HepRep was not developed specifically for Geant4 but is intended as a generic interface between
data sources and event display clients.
-
Because the HepRep file format was not created specifically for Geant4, it does not have exactly the
same set of graphics primitives as Geant4. Geant4 solves this by decomposing some of the more complex
Geant4 shapes into simpler polygons before they are written out to HepRep.
-
HepRep is further described at:
The HepRep Home Page
The .heprep file format is fairly easy to understand just by looking at it.
Here are some lines from one example:
<heprep xmlns="http://www.freehep.org/HepRep"
  xmlns:xsi="http://www.w3.org/2001/XMLSchema-instance" xsi:schemaLocation="HepRep.xsd">
  <layerorder="Detector, Event, CalHit, Trajectory, TrajectoryPoint, Hit"/>
  <typetree name="G4GeometryTypes" version="1.0">
    <type name="Detector">
      <attvalue name="Layer" showLabel="NONE" type="String" value="Detector"/>
      <attdef category="Physics" desc="Logical Volume" extra="" name="LVol"/>
      <attdef category="Physics" desc="Material Name" extra="" name="Material"/>
      <type name="Detector/World">
        <type name="Detector/World/Calorimeter">
          <type name="Detector/World/Calorimeter/Layer">
            <type name="Detector/World/Calorimeter/Layer/Lead">
            </type>
          </type>
        </type>
      </type>
    </type>
  </typetree>
  <typetree name="G4EventTypes" version="1.0">
    <type name="Event">
      <attvalue name="Layer" showLabel="NONE" type="String" value="Event"/>
      <type name="Event/Trajectory">
If you have not yet run the A01 tutorial, this might be a good time to do so.
You will then have a file called:
geant4\examples\extended\analysis\A01\G4Data1.heprep
You can also skip running Geant4 for now and instead find a copy of this file
here (this version differs from the one you would have
created yourself only in that this version has been compressed using gzip - this saves
a factor of about 20 in space and can still be read directly by WIRED, no need to unzip).
The commands from that example that generated the .heprep file were:
../bin/$G4SYSTEM/A01app
/vis/open HepRepFile
/vis/scene/create
/vis/scene/add/volume
/vis/sceneHandler/attach
/vis/viewer/flush
/vis/scene/add/trajectories
/vis/scene/add/hits
/tracking/storeTrajectory 1
/run/beamOn 1
The output appears as soon as the /run/beamOn is complete since an update command is included in
this example's RunAction class. If you run some other example and find that the event doesn't
draw automatically at the end of the run, just issue the following command:
/vis/viewer/flush
You can even put this command into a macro file and then cause this macro to be called at the end
of each event by adding the macro name to the run command, as in:
/run/beamOn 1 my.mac
Other commands that might be useful are discussed in this document's section called
Further Resources.
Ignore any commands related to setting camera views, lighting or surface style.
Those commands are only relevant to an immediate visualization driver such as OpenGL.
When you work with a driver such as DAWN that has a 3D file format, you set these
things later, from the visualizaton application, DAWN.
The installation instructions are taken from the
SLAC WIRED Users Home Page in October 2003.
If significant time has passed since that date, or if you just want more detailed
information, please check back with that original source.
Users are encouraged to install and run WIRED on their desktop machines
rather than running it via x-windows from central Unix systems.
Wired will work either way, but the best performance comes when it runs
on the desktop (and this frees central Unix CPUs for more suitable work).
Installing Java
Start by making sure you have an appropriate version of Java on your system,
a version number of 1.4.1 or greater.
You can check the version number by typing the following from a command
or cygwin window:
java -version
If you don't already have the appropriate Java:
Installing WIRED
Note that the WIRED installer does not make any changes to your registry
or other system files. You can always remove WIRED by just deleting the
single directory structure into which WIRED is installed.
So don't worry - give it a try on any machine.
To download WIRED, copy a single file of about 7M to your
own directory (it doesn't matter where you put it, the install procedure will
later ask you where you really want to install WIRED). Take the file from:
Open a command window and go to the directory where install.class is located.
Before you actually run the installer, note one thing:
-
You will be asked what directory you want to install Wired to -
do not specify a directory that has a space it its name (such as the
very common Windows directory name "Documents and Settings").
Now run the installer by typing the following command:
java -cp . install
If you are running through x-windows, the install procedure may have trouble
getting the correct fonts to show the install dialog boxes.
You can instead just skip the dialog boxes by typing:
java -cp . install /p
The result will be as if you had selected all of the default options.
Wired will be installed to the directory "Wired".
Starting WIRED
The executable is in Wired's bin directory.
Run it by typing:
wired
There are large number of additional
startup options
that most users will never need.
Additional Notes for Cygwin, Linux, Windows ME, Windows 98 and Windows 95 Users
-
Linux users who do not have the current directory in their Path will
need to prefix this with a dot and a slash, as in:
./wired
-
Cygwin users may find that they first need to do:
export WIRED_HOME=<your_top_level_wired_directory>
-
Windows ME users must first type:
SET OS=Windows_NT
yes, that's Windows_NT even though your actual system is Windows ME.
-
Windows 98 or Windows 95 users must first type:
   SET OS=W98 (or W95)
   SET WIRED_HOME=<your_top_level_wired_directory>
and then run by typing "sh wired.sh" instead of just "wired".
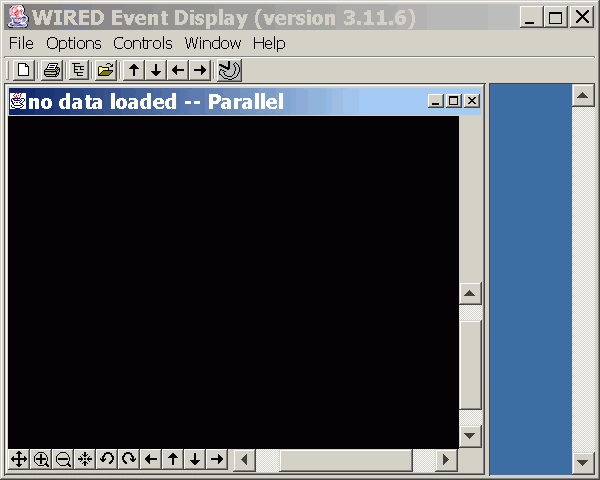
You should see an empty WIRED window as follows:
Event Chooser
 Use the Event Chooser to select some data.
You should see a new window as follows:
Use the Event Chooser to select some data.
You should see a new window as follows:
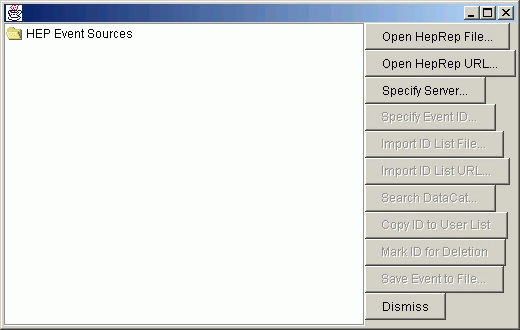
-
Select "Open HepRep File..."
and navigate to the directory where you wrote your .heprep file.
This should be something like geant4/examples/extended/analysis/A01/G4Data1.heprep.
-
If you have not run the G4 tutorial example yourself, you can find the same .heprep file
here
-
You can even just have WIRED read that file over the web by using "Open HepRep URL..."
rather than "Open HepRep File..."
and specifying
http://www.slac.stanford.edu/~perl/heprepxml/G4Data1.heprep.gz
You can also use the "-file" startup option to have WIRED start right off with
a particular heprep file (either from local disk or from the web). Examples might be:
   wired -file wired -file c:\jp\slac\geant4\G4VisTutorial\G4WIREDTutorial\G4Data0.heprep
   wired -file /afs/mydir/mysubdir/G4Data0.heprep.gz
   wired -file http://www.slac.stanford.edu/~perl/heprepxml/G4Data0.heprep.gz
And if you are reading files from disk (rather than a URL),
you can always quickly go to the next file produced by Geant4 by hitting the
right arrow button at the top of the window.
This "next event" button always gets the next .heprep or .heprep.gz file
alphabetically in the current event's directory.
Since each new event produced from Geant4 has a sequential heprep file name, this button
gets you the next Geant4 event.
You may notice that the CD and web accessible files have the suffix
".heprep.gz" whereas the version you make directly from Geant has just
".heprep". This is because WIRED can accept gzipped HepRep files
as easily as unzipped HepRep files. Unzipped HepRep is an easy format
for people to read and, if necessary, edit (it is an XML format),
but the files can get very large. GZipping solves this problem,
compressing the files to about five percent of their original size.
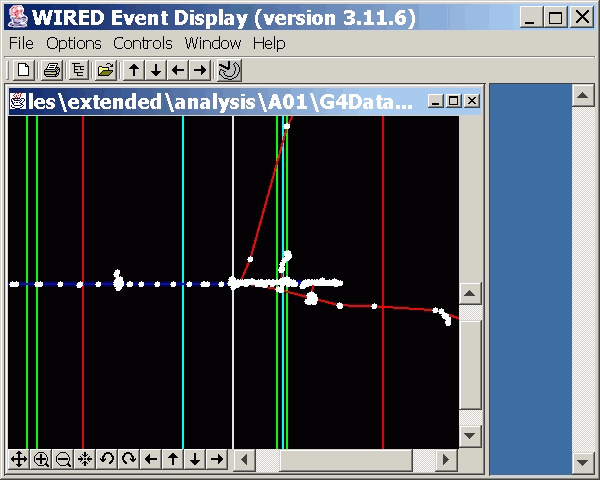
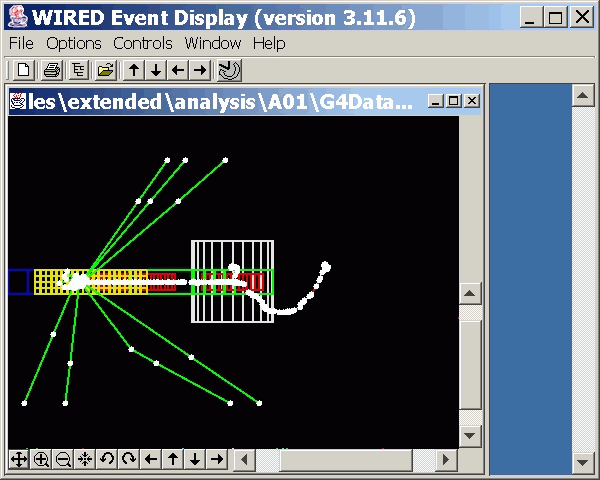
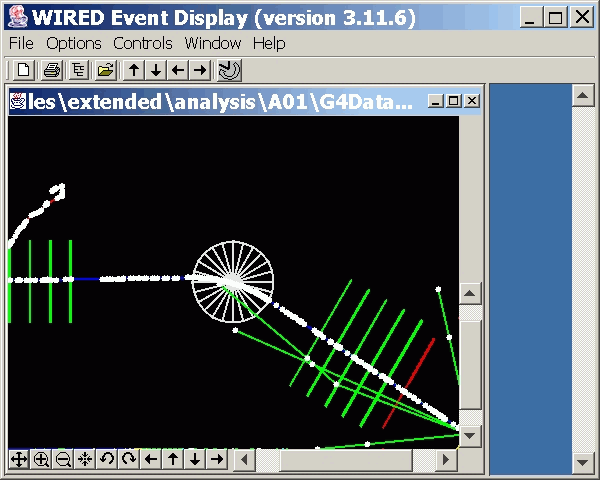
Regardless of how you open the file, you should end up with an image as follows:
The other options on the File Chooser are not relevant to this G4 tutorial
but are discussed in detail in the
SLAC WIRED Home Page.
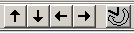
Orientation Toolbar
The bottom of the view window contains the Orientation Toolbar.
These buttons control zoom, rotate and translation functions
(later you will learn how to also control these with various mouse drag
operations).
-
 Fit To Window adjusts scaling to make the entire image fit the window.
Try this right away to make the entire G4 example fit the current window.
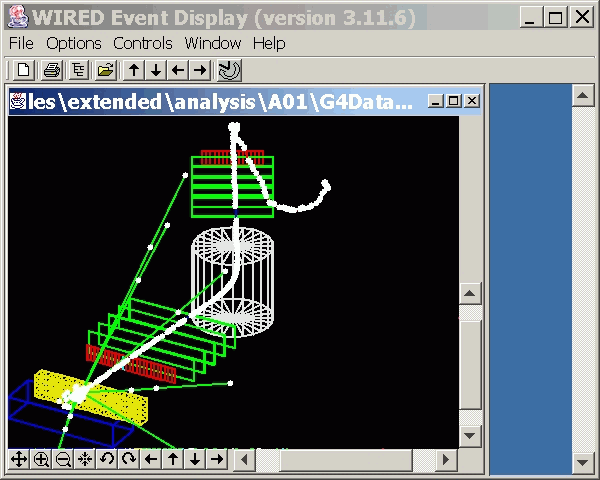
You should then see the following:
Fit To Window adjusts scaling to make the entire image fit the window.
Try this right away to make the entire G4 example fit the current window.
You should then see the following:
the rest of the orientation toolbar
-
 Zoom In and Zoom Out.
-
 Center the image.
-
 Rotate the image around the axis perpendicular to the screen.
-
 Translate the image left, up, down or right.
-
 Rotate the image around the screen's vertical axis.
You can either click on the little arrows on either side of the slider
or you can click and drag the slider.
Rotate the image around the screen's vertical axis.
You can either click on the little arrows on either side of the slider
or you can click and drag the slider.
-
Another rotation tool to the right allows rotation around the
screen's horizontal axis.
The following shows a rotation around the screen's horizontal axis.
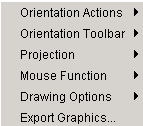
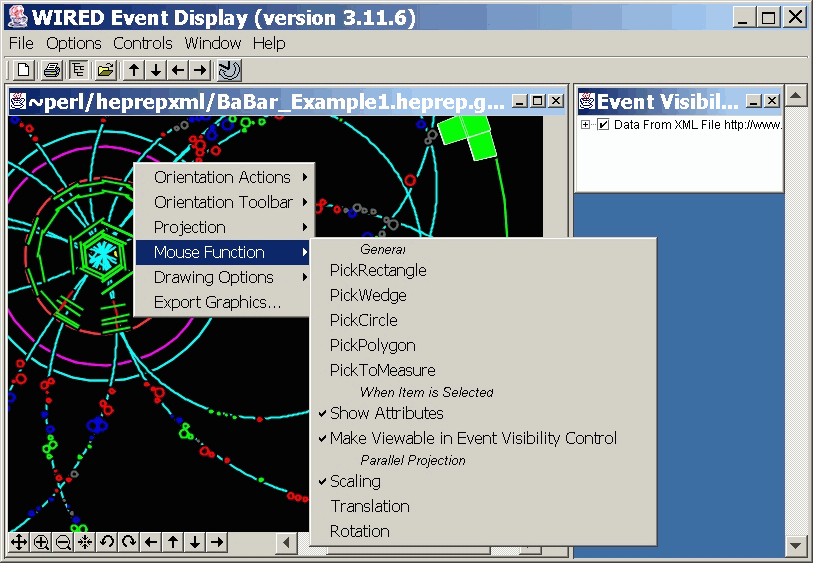
Orientation Actions in the Popup View Menu
To select from among some standard views, place the cursor into the window
that contains the event display and hit the right mouse button
(Macintosh users, hit control and mouse button).
You should see a new window as follows:
Then select "Orientation Actions", which will give the following submenu:
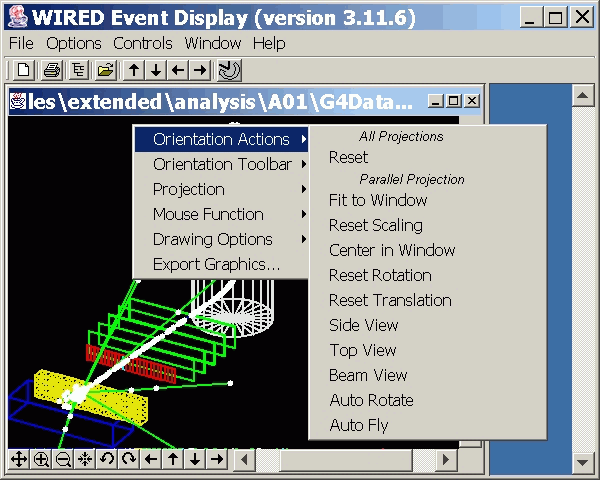
Use these options to select standard views or reset to the initial view.
"Top View", for example, will give you the following:
Again use the "Fit To Window" button to make the entire image fit in the
window.
The rest of the popup view menu will be discussed later.
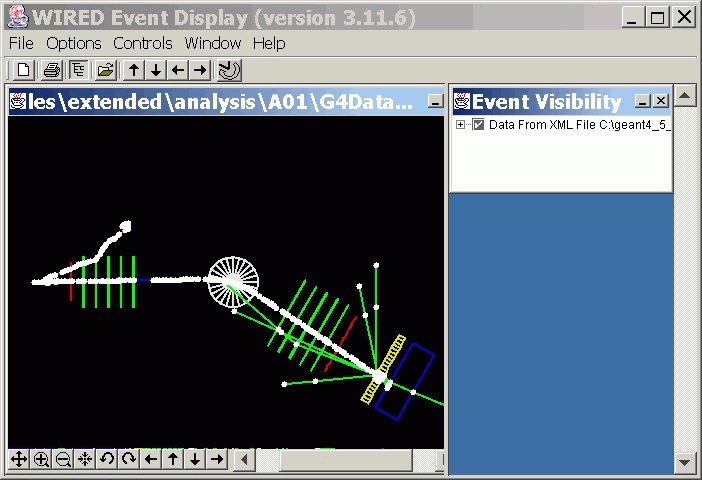
Event Visibility Control
 use the Event Visibility Control to toggle on and off visibility of data
and detector elements.
use the Event Visibility Control to toggle on and off visibility of data
and detector elements.
A tree will appear at the right side of the main window.
Widen the main window a little by dragging on the window's right side.
You should then see the following:
- Click on the plus signs to expand the tree.
If you expand the first level, you should then see separate items for
"Event Data" and "Detector Geometry".
- Click on the check marks to toggle items visible or invisible.
Try turning off first the Event Data and then the Detector Geometry.
Turn the Detector Geometry data back on.
- Click on the plus signs to expand the tree. Further.
Each check mark controls visibility of everything from that level of the
tree downward.
- If you see no change when you turn an item on, expand that part of the
tree and turn on the items deeper within the tree.
- To see a popup menu with more tree manipulation options,
position the cursor over a part of the tree and hit the right mouse button
(Macintosh users, hit control and mouse button).
The popup menu includes options to expand or turn on an entire tree structure
with a single action.
- Point at the line "Detector Geometry", right click, and select
"Expand All Below".
You will then see the entire detector geometry tree.
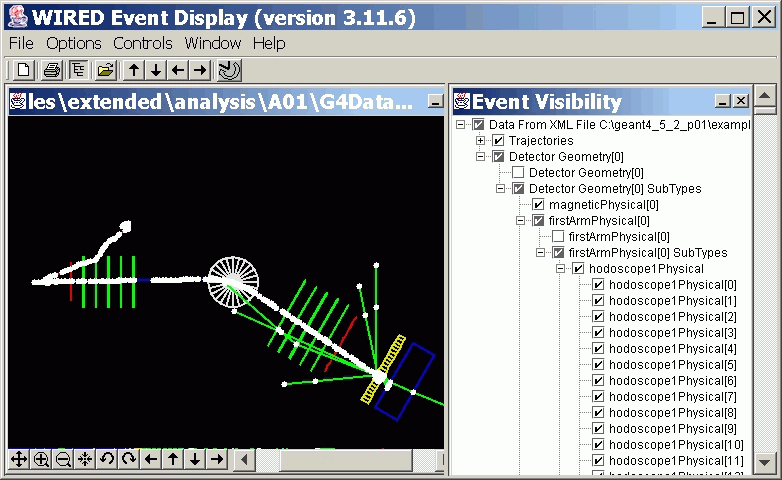
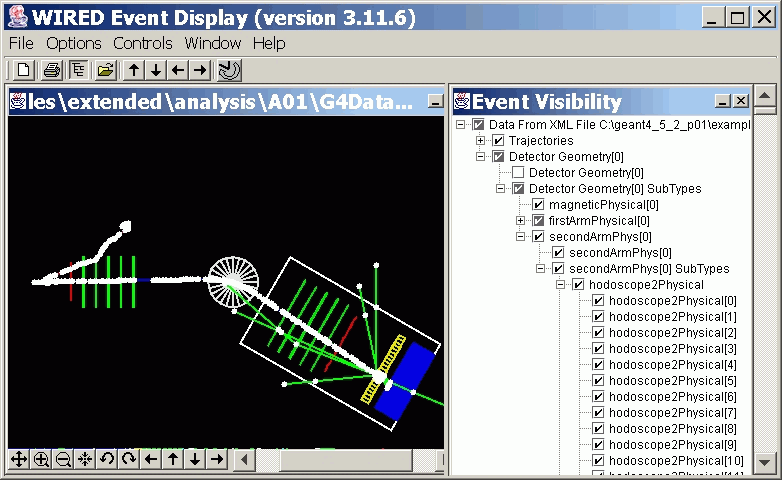
- Close the part of the tree called "firstArmPhysical".
- Point at "secondArmPhysical", hit the right mouse button and select
"Show All Below".
The Hadronic Calorimeter, depicted as the blue rectangle at the lower right,
will then have so much detail that it appears as a solid filled area
(actually a very complex set of individual calorimeter cell outlines).
Interaction Between View Window and Event Visibility Tree
Picking on objects in the view window can cause them to highlight in the
Event Visibility Tree, and the opposite is also true.
-
To try this, return now to the Popup View Menu by pointing at the view
window and hitting the right mouse button.
- Expand the "Mouse Function" submenu and select "Pick Rectangle".
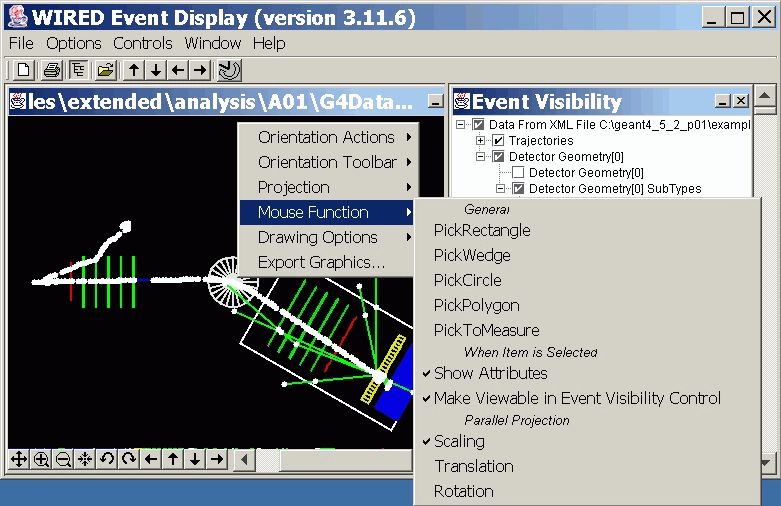
- Now click and drag with the left mouse button to select some objects
from the view. Try picking on the top part of the white circular structure at the center of the view.
- A window will pop up that tells some attributes of the picked object (it was a magnet),
the picked object will now stand out (all other objects will be dimmed)
and the corresponding object will highlight in the Event Visibility Tree.
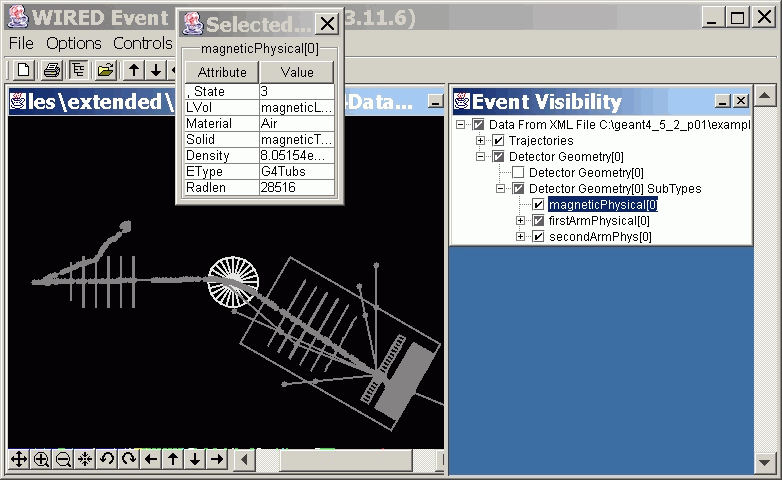
- To undo the highlighting, pick on any empty part of the view.
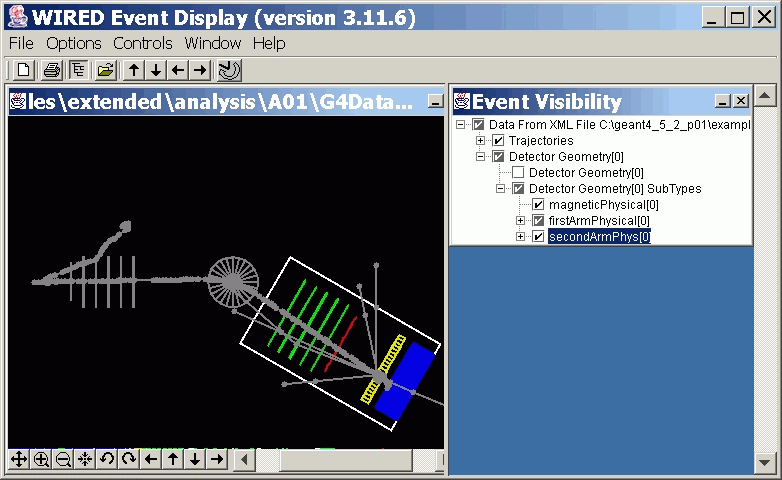
- To see the inverse of this effect, again expand the Detector Geometry part of the
Event Visibility Tree, point at its item named
"secondArmPhysical", hit the right mouse button, and select "Toggle Highlighting".
The entire secondArmPhysical should now be highlighted in the view window
(all other objects will be dimmed).
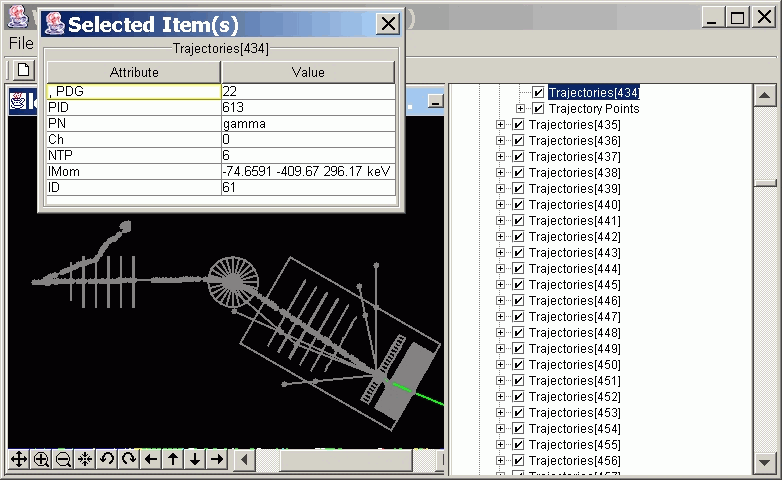
- Picking on trajectories will give you information about the selected particle.
Try picking on the trajectory that disappears off the lower right corner of the view.
You will find that this was a gamma.
Expand the popup attribute window a little (by clicking and dragging on a corner)
to read the entire momentum string.
This gamma had momentum of -74.7,-409.7,296.2 keV.
- The attributes you see here were filled in Geant4's class
source/tracking/src/G4Trajectory.cc.
WIRED simply displays whatever attributes were set in that Geant4 class.
You could easily add additional attributes by setting them in your own copy
of G4Trajectory. The relevant lines have the form:
  G4String Ch("Ch");
  (*store)[Ch] = G4AttDef(Ch,"Charge","Physics","","G4double");
and
  s.seekp(std::ios::beg);
  s << PDGCharge << std::ends;
  values->push_back(G4AttValue("Ch",c,""));
- If you didn't see any attributes when you picked on the trajectory, it may be that your
particular Geant4 example is using some special verison of G4Trajectory that doesn't fill
any attributes. Try the standard version of G4Trajectory, or copy that version's
attribute-filling logic into your special G4Trajectory.
Specialized Projections
The WIRED Event Display can perform many specialized projections that
distort the detector space in useful ways.
Because some of these projections assume a cylindrical detector design,
read in a more appropriate detector geometry file before proceeding
with the tutorial.
-
Use the file BaBar_Example1.heprep.gz which you can find
here
-
You can even just have WIRED read that file over the web by using "Open HepRep URL..."
rather than "Open HepRep File..."
and specifying
http://www.slac.stanford.edu/~perl/heprepxml/BaBar_Example1.heprep.gz
When the image appears, reset to standard scale and rotation by using
the Popup View menu (the menu you get by right clicking on the view window)
and selecting "Orientation Actions"..."Reset".
Also, undo any left over picking information by picking on an empty area of the image.
You should end up with an image as follows:
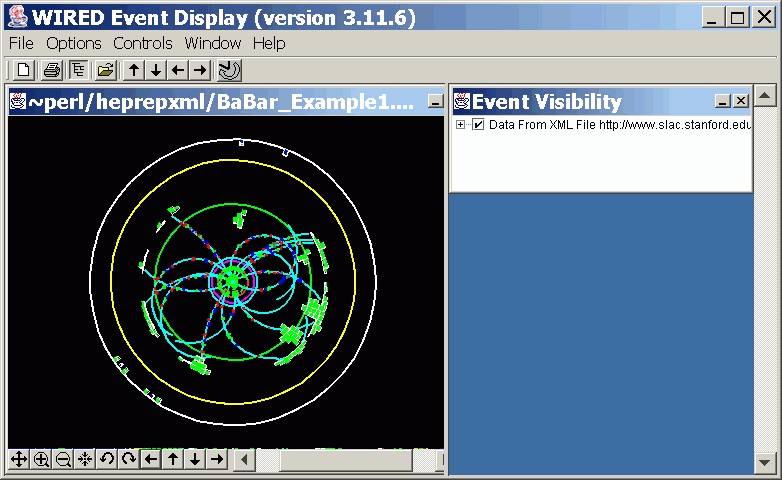
The image shows a simplified rendition of the BaBar detector
with real data from the collision of an electron with a positron
at the PEPII accelerator at SLAC.
- The green dots at the center are hits in a Silicon Vertex Tracker.
- The red, blue and green dots outside of that area are hits in a
Drift Chamber (different colors represent different "stereo angles",
a drift chamber design detail we won't go into here).
- The green squares outside of that area are hits in an Electromagnetic
Calorimeter.
A good example of a specialized projection is the "FishEye Projection".
From the Popup View menu, select "Projection"..."FishEye".
You should then see the following:
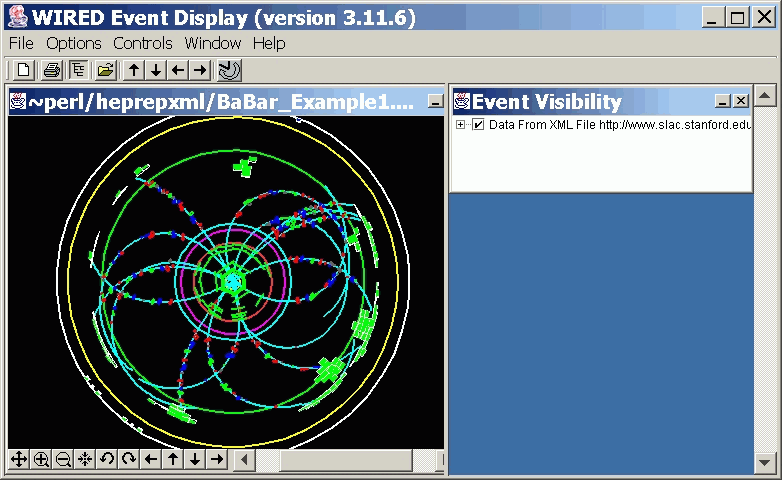
The FishEye has distorted the space such that the inner parts of the
detector are exanded while the outer parts of the detector are compressed.
This can be superior to a standard zoom since, while it allows a close
inspection of the inner area, it still allows one to correlate inner
detector data with outer detector data.
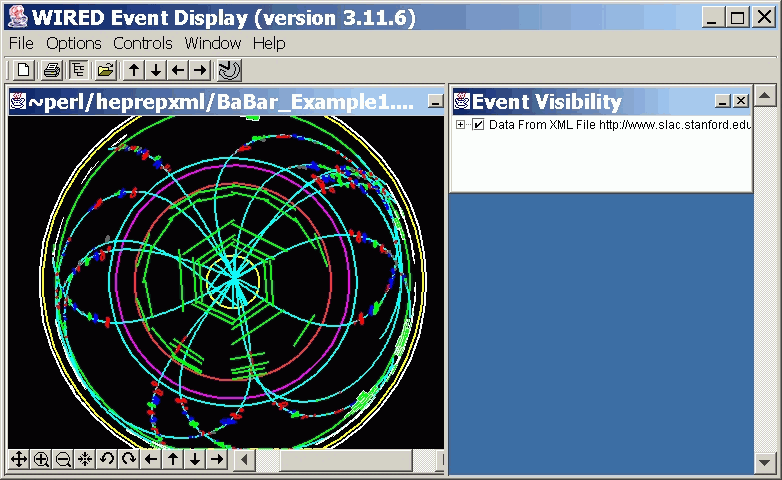
With the specialized projection comes a specialized mouse function.
Try clicking the mouse near the center of the image and then dragging
outward. The FishEye quality will be enhanced (you have altered the
FishEye's "alpha" parameter), such as in the following:
Two more examples of projections are:
-
Z-FishEye
a projection in which you can control what percentage
of screen space is given to low Z versus high Z parts of the detector
(no effect will be visible from the beam view,
select side or top views instead).
The mouse will default to control this new variable, known as "alpha",
and the Mouse Function menu will now show more options, such that the mouse can
control either this new "alpha" variable or can control any of the
standard variables (scaling, translation, rotation).
-
Rho-Z
the detector is cut along a plane of constant phi angle.
All elements above this plane are collapsed together on the top half of
the display, all elements below this plane are collapsed together on the
bottom half of the display.
The mouse will default to control this new variable, known as "phi0",
and the Mouse Function menu will now show more options, such that the mouse can
control either this new "phi0" variable,
or a degree of FishEye projection, or any of the
standard variables (scaling, translation, rotation).
Return to the Parallel Projection before continuing with the tutorial.
Multiple View Windows
 To open additional view windows, click the "New View" button.
Then from the "Window" menu, select "Tile" to lay out the two views
as follows:
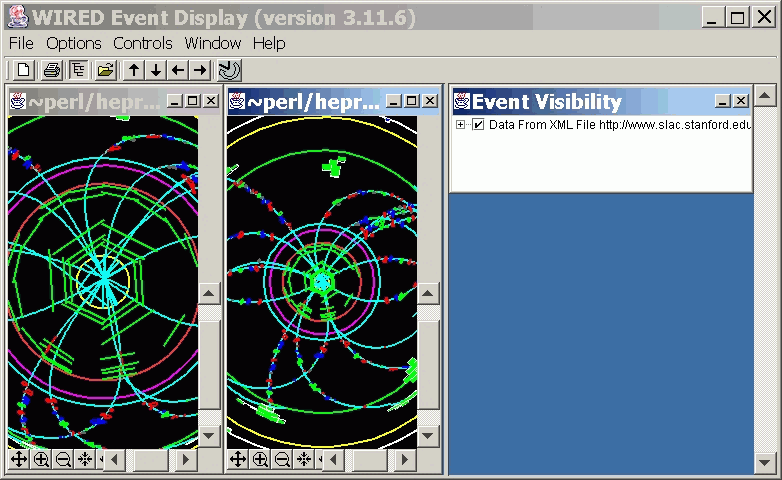
You can then control the views separately.
The following example shows four views:
- At top left is a Parallel Projection beam view.
- At top right is a FishEye Projection beam view.
- At bottom left is a Parallel Projection side view, slightly zoomed in, with detector geometry
turned off and anti-aliasing turned on (use the popup menu's "Drawing Options"..."AntiAlias" toggle).
- At bottom right is a Parallel Projection top view, slightly zoomed in, with detector goemetry
turned off and anti-aliasing turned on.
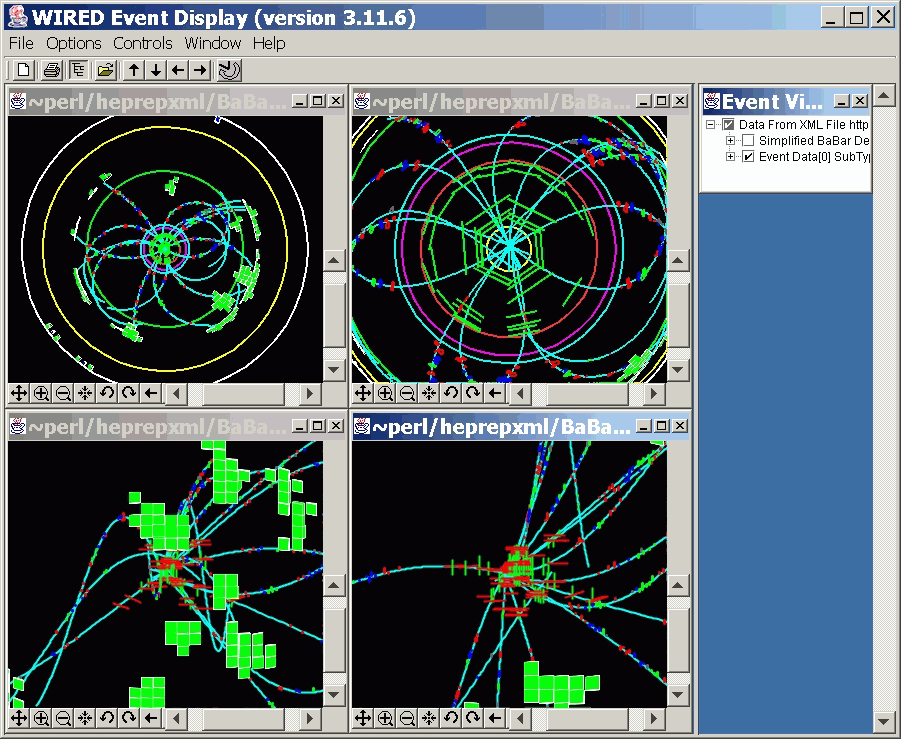
Each view has its own Event Visibility Tree.
The visibility tree that is shown at the right always corresponds to the
currently selected view.
Printing
 To print the selected view directly to a printer (as a bitmapped image),
click on the printer icon.
Your regular system printer selection dialog will then take over.
For many higher quality print options, including vector PostScript,
select the Popup View Menu's "Export Graphics...".
To print the selected view directly to a printer (as a bitmapped image),
click on the printer icon.
Your regular system printer selection dialog will then take over.
For many higher quality print options, including vector PostScript,
select the Popup View Menu's "Export Graphics...".
-
If you have remote disks attached, this dialog can be slow to come up.
Just be patient.
-
Start by selecting a filetype (from the bottom part of the dialog box):
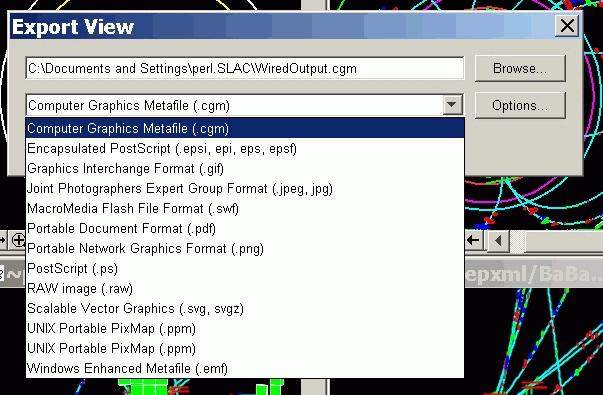
-
You will then be given various additional options specific to the filetype.
Additional Mouse Functions
You have already seen the mouse used for picking objects to see their
attributes, and for adjusting the FishEye projection's alpha parameter.
The Popup View Menu's "Mouse Function" menu lets you also configure the
mouse in other ways:
-
PickWedge, PickCircle and PickPolygon are similar to PickRectangle,
but they let you define the pick area in other ways.
Give them a try.
-
To pick more than one object at a time (for example to highlight
two different tracks), pick the first one normally, then hold down the
control key while you pick the second one.
-
Pick To Measure toggles on a feature that lets you measure the distance
between two points.
Click at the first point and then drag to the second point.
(Remember that, as the mouse knows nothing about the coordinate into or
out of the screen, the measurement you are getting is just the component
in the screen plane.)
-
Show Attributes lets you disable the pop-up table that shows the
attributes of picked objects.
-
Make Viewable in Event Visibility Control lets you stop the event visibility
control from showing what you have picked.
-
The remaining items vary depending on the current projection.
For the default, Parallel Projection, these functions include zoom,
translate and rotate.
An interesting feature of WIRED is that projections are "daisy-chained".
The results of the Fish Eye Projection, for example, are subsequently
piped through a Parallel Projection. This means that after you have
adjusted the fish eye's alpha parameter, you can also perform a standard
spatial rotation around the detector, such as:

Additional Buttons on the Top Button Bar
The last five buttons at the top of the WIRED window are not relevant
to data from HepRep files. They are only used when the HepRep data is
read directly from a server (moving up and down prearranged event lists,
moving to the next event or previous event and automatically moving through
a sequence of events). To try using WIRED to look at events from the
BaBar collaboration's HepRep servers, see the
SLAC WIRED Home Page.
Additional Items in the Popup View Menu
-
Orientation Toolbar
turns off and on the orientation toolbar that was described above.
-
Drawing Options...Show Shadows
lets you control whether objects have drop shadows.
Such shadows make it easier to see objects when they fall on top of
another object of similar color, but they slow down the system
and can appear unattractive in some hard copies (due to the different
background color used in a hard copy).
-
Drawing Options...AntiAlias
lets you control whether lines are anti-aliased, a rendering technique that improves
the smoothness of lines at some cost to interactive performance.
-
Drawing Options...Always Use Fast Mode
speeds up performance by using fast drawing options.
Lines are always rendered a single pixel wide.
Area fills are ignored.
By default this option is turned off and fast mode is only used during mouse drag events.
So when, for example, you click to zoom, drawing is done in fast mode only until you complete
the drag motion.
-
Drawing Options...Show Status
lets you control whether a status box is drawn in the top right corner
of the view window. This status gives parameters of the view.
If you need to quickly repeat the commands to generate the .heprep file, it may be
helpful to cut and paste a set of commands from this list:
../bin/$G4SYSTEM/A01app
/vis/open HepRepFile
/vis/scene/create
/vis/scene/add/volume
/vis/sceneHandler/attach
/vis/viewer/flush
/vis/scene/add/trajectories
/vis/scene/add/hits
/tracking/storeTrajectory 1
/run/beamOn 1
Joseph Perl
13 October 2003